Getting Started
Receive Morse:
Feed radio audio signal into the computer. Plug an audio (or USB) cable into the
- Line input jack
- Microphone jack or
- USB port
Run MRP40 click on -Options -View -Soundcard
A window will come up like image shown below
Step by Step click the items indicated by the numbered red arrows.
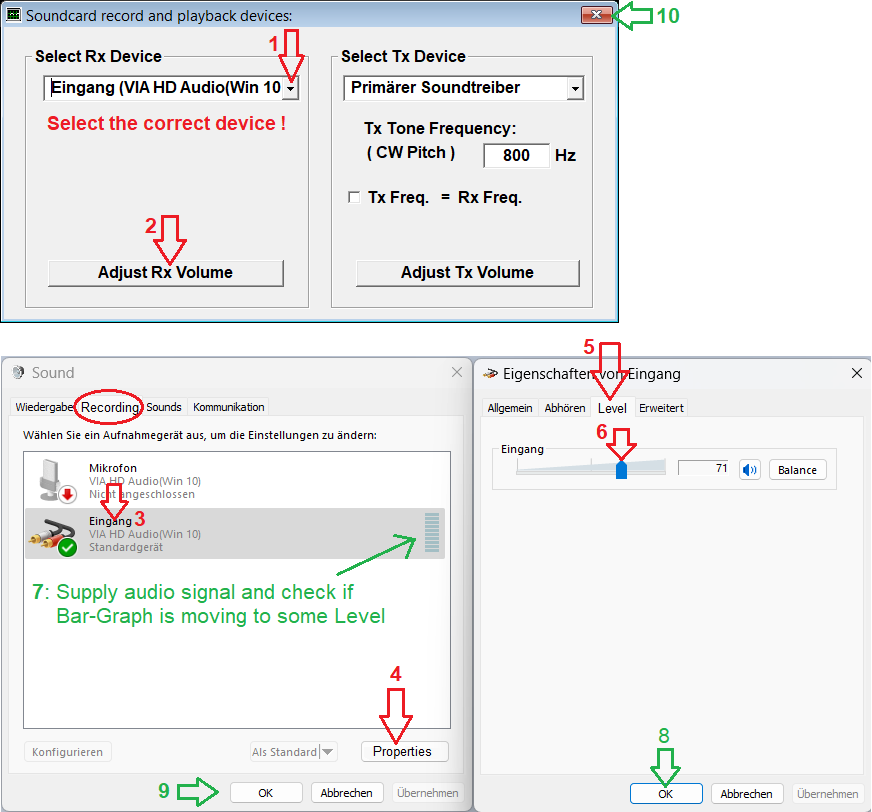
Please read further instructions to set the right Audio Volume, click here!
When Volume setting is finished then feed MRP40 with reasonable Morse tone signals. Immediately you will see the dots and dashes on the Audio Band Display. Point with your mouse on that "Morse print" and click, immediately the two red lines will be placed there. The two red lines represent the center frequency and band width of the CW filter of MRP40. Fine tuning of center frequency will be done by MRP40 automatically. (AFC) The center frequency is displayed on the left side: xxxx Hz ( red )
Remark: When AFC is switched OFF then you can "fine-adjust" the center Frequency of CW filter by clicking into the Audio Band Display, hold the left mouse key down then shift the mouse, the movement relative to the red lines is transformed 1/10, while moving mouse watch on left side the center frequency xxxx Hz ( red ) This was designed to enable a real "Fine Adjustment"
You may estimate the speed of the incoming Morse signal, then set the "Rx---WpM" roughly to the estimated speed by clicking "+" or "-" button quickly MRP40 will "tune" to the exact Rx speed automatically. Immediately the decoded text will be displayed
Rapid Capture: You have received a QSO text, now you want to copy the call sign of the other OM into your Log Book Program: Just point the mouse to the part of text you want to copy, press left mouse button and select the desired part of text. Rapidly in the moment you let mouse button up, the selected text is copied to clipboard. Now you can paste the text to your Log Book.
TO ZERO BEAT THE OTHER STATION:
If you want to transmit on the frequency of the station you are listening to, then move the parallel red lines up or down so that frequency that shows up in the little window on right side of the screen shows the CW offset frequency of your receiver. Then turn the MRP40 AFC off so that the parallel red lines don't move all over the screen as you tune to different stations. Now tune in a station you want to work so that black dot and dash bars are moving between the red lines.
For example the offset on Kenwood TS-850 is set for 600 Hz. So you move the red lines up or down until the readout in the lower right window reads 600 Hz (or very close to it). Now, when you go to transmit you will be in "zero-beat" with the station to which you are listening. If you don't do this, you will be transmitting on a different frequency than the other station.
WORKING DX PILEUPS:
In Pile up situation you can see on the MRP screen that other stations are calling the DX station. Here are two strategies for using the MRP40 screen.
(1) You can find and see the station that just caught the DX station, tune your second VFO to that frequency and call the DX as soon as the calling station finishes the QSO.
(2) You can also see where there might be a "hole" between calling stations and you can set your second VFO there.
Send Morse:
Start MRP40, click menu -Options -TxSettings choose:
-Send via COM Port or
-Send via Soundcard or
-Send via WinKeyer
Click menu -Options -TxSettings -Use Send Button
Click menu -Options -Show Interface-Plan to see how to connect (USB) COM Port with your transceiver.
Type your message into the lower green text box.
There are 8 Buttons in a row which allow you to send pre defined text from file.
To define a new text just point with the mouse on a button and click RIGHT mouse key. Immediately a text window will appear and you can type your text there.
Set the Tx --WpM speed by clicking on related "+" or "-" button