Options -TX Settings
Essential options for sending Morse signals
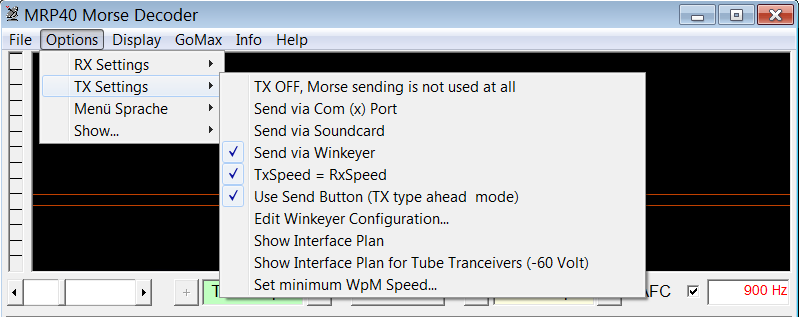
TX OFF, Morse sending mode is not used at all
Use this option if you do not want to send Morse using your computer keyboard.
The MRP40 program window will be cleared from sending buttons etc. to give maximum available size to the receiving text box.
Send via Com (x) Port
A window will pop up where you enter the ComPort number to be used for sending.
Click the "Save" button to activate the selected port.
Note: the number "0" indicates that no ComPort is active
Once a valid ComPort number is saved the MRP40 main window will show an additional row of buttons and an additional
Text Box for sent text.
For Send pin choose DTR or RTS (That pin does key out the Morse sequence)
The PTT Function will automatically be assigned to the other pin.
The PTT Pin is activated all the time while the Morse sequence is keyed out.
The PTT Pin can also be activated while you send via soundcard (instead via ComPort) just activate the related checkbox.
Send via Soundcard
Two windows will pop up:
a) Soundcard:
Here you can select the TX (and Rx) soundcard.
Enter the TX tone frequency (Side Tone) or choose Tx-Freq.= Rx-Freq.
This does automatically set the Audio Tx frequency equal to Rx Frequency.
This is very helpful to perfectly match (zero beat) the frequency of remote CW station
( your transceiver does Tx in SSB mode the soundcard audio out signal)
Via 2 Buttons one can open the according volume control panels.
Before changing any volume make sure the correct soundcard is selected in that volume control panels.
(-Options -Properties -MixerDevice)
The big button will pop up a small tool that allows you to save (or reload) your valuable volume settings.
Before you do that make sure the correct soundcard is selected in that small tool.
b) RS232 Comport configuration
In case you need in addition to activate a PTT pin while sending via soundcard you can do that here:
- For PTT-Pin choose DTR or RTS
- Make sure you enter a correct ComPort number.
- Make sure you click the "Save" button to let the entered number take effect.
- Note: the number "0" does indicate that no ComPort is activated.
- Check the box named Activate PTT pin while sending via soundcard
Send via WinKeyer
A window will pop up where you need to enter the ComPort number the WinKeyer is assigned to.
To find out the correct COM Port number of WinKeyer you might want to lookup the list of COM Ports on your computer this way: In the search box on the taskbar, type device manager, then select "Device Manager" from the menu and click it, now look in the list of different types of devices for Ports (COM & LPT) expand that section and check out which port number is related to the WinKeyer.
Once you have enterd the ComPort number click he Save button. It will open the WinKeyer. If successful the WinKey IC-version will be displayed in the headline of the window.
Please also configure the Winkey Mode and then click on the button Set this Mode
Use Sendbutton (TX type ahead mode)
Activating this option allows you to type (and correct) the text completely before it is send.
Note: the Morse sending mode must be activated, then this option will show up a button with the caption "Send"
Deactivating this option will hide the send button
Edit Comport Pin Configuration
A window will pop up where you can enter the ComPort number to be used for sending.
Make sure you click the "Save" button to let the entered number take effect
Note: the number "0" does indicate that no ComPort is activated.
For Send pin choose DTR or RTS (That pin does key out the Morse sequence)
The PTT function will automatically be assigned to the other pin.
The PTT Pin is activated all the time while the Morse sequence is keyed out.
The PTT Pin can also be activated while you send via soundcard (instead via ComPort) just check the related checkbox.
Show Interface Plan
Easy to build up transistor interface with R-C Low-Pass to be connected to DTR- or RTS- Pin of RS232 ComPort.
On the output side the interface has to be connected to the key input of transceiver.
Note: instead of this transistor interface we recommend to use the "SignaLink" interface box. It does provide galvanic isolation between PC and transceiver. Just look it up on the internet.
Show Interface Plan for Tube Transceivers (-60 V)
Easy to build up transistor interface with relay.